Showing posts with label Hacking tricks. Show all posts

Wednesday, February 19, 2014

Create Your own WiFi Hotspot Router

Now a days, almost every user have smartphones laptops and pc's. Whereas most of the users are using Local Area Networks to connect their Pc and Laptop with Ethernet cable. But they will be missing using internet on their smartphones. In this computer tip, i will tell you about how to make your own WiFi hotspot Router using your own Laptop, or a computer. All you need to do is to download a tool to create a wifi hotspot. Just follow the simple steps below.
Create WiFi hotspot
Connectify Hotspot Make Your Laptop a WiFi hotspot
This post is specially for laptops because mostly all laptops have a built en WiFi adapters in them. But if you want to use this computer tip with your Desktop Pc, then you  have to buy a WiFi adapter for your system like TP-Link etc.

  • First of all download the tool from the Link given below. 

  • Download "Connectify Hotspot".
  • Once downloaded, install it and Run it.
  • Now all you have to do is Write the name of SSID(your wifi name), and set your own Security key.
  • Then Select LAN card  to share using Share Over your laptop's or pc's wifi Adapter.
  • Then Click on Start Hotspot. That's it...
Now use your smartphone to scan for WiFi. You will find out your own WiFi on your smartphone. Just enter you security key, and use internet over WiFi.
Try this. Its a fun.. :)
Read More

Sunday, February 16, 2014

Hide Your Hard Disk Partition

Computer tips By Numan Shah

Privacy is the most important thing that everyone wants when using computer or laptop. Everyone wants to keep his personal files and folders hidden or he wants that no one can approach to his files or folders. We can do so many methods to hide our folders,files and other data. Even we can protect our partitions or folders using passwords. But in this new Computer tip, i have a new trick for you, in which you don't need to hide any single folder or a file. Neither you have to lock your folders or partitions nor you have to hide your files. In this post, i will tell you about how to hide your Hard Disk Partition or Drive. After following the simple steps you will be able to hide your Hard Disk Partition. All you need to do is to keep your personal data that you don't want to share, in one Partition, and hide it. You can unhide your Partition at any time.
  • Go to Start and Go to Command Prompt(CMD) and Run it.
  • Write "Diskpart" in Command Prompt and press Enter key. After a second, Diskpart will appear.
  • Write "List Volume" and see all your Partitions will appear.
  • Now select the Volume that you want to Hide.
  • Write "Remove Letter x" (x is the Drive letter you want to hide).
  • Now go back and check in My Computer, You will see the Partition is no more showing.
Hide Your Hard Disk Partition
Hide your Hard Disk Partition
  • If you want to unhide your Partition, Just repeat all the steps and replace Remove Letter x with Assign Letter x and Press Enter Key. Now go back and see the Partition will be showing up there in My Computer.
Try this Amazing computer trick, a very handy and useful to keep drive and data save.
For more Computer Tips, Subscribe to our Blog. :)
Read More

Wednesday, February 12, 2014

Use Multiple Internet Connections Simultaneously

Got multiple connections? Wanna join multiple internet connections on single computer? Check out my tutorial about how to utilize multiple internet connections at once to get faster bandwidth and speed. In this tutorial i will help you about how to mix up your internet connections at single pc that will add up the bandwidth of all the internet connections and give you an output of the sum of all the bandwidths. To increase your internet speed by using multiple internet connections, Follow the simple steps below.
NOTE: You can join all type of internet connections at once like 3G,4G, WLAN or Ethernet internet connections.
Multiple internet connection
Connectify Dispatch Pro
  • First of all, you need to be using Windows 7 (SP1) or above, then download a program named “Connectify Dispatch Pro”.
  • You can download this program by Clicking the link Below.
  • Click Here to Download “Connectify Dispatch Pro”.
  • Install the program, and then Run this program.
  • Now connect all your internet connections (3G,4G,WLAN or Ethernet) to your system.
  • Once you connected your internet connections then Click on on ‘Start Dispatch’ button.
utilize multiple internet connections
When Single Adapter Connected
This will integrate all you internet connections and give you the output as the sum of all the internet bandwidth. You can see the following screenshot that i taken by myself.
Boost internet speed
When two adapters start working together

When you connect two internet connection and Dispatch them then you can see the third Black output line as shown below.
join two internet connections on one pc
Output bandwidth

Try this and get amazing combined internet speed. Don't forget to tell your friends about this post. Share it

Read More

Monday, February 10, 2014

Quickly Approved Google Adsense Account

This Post is specially created for the visitors from Pakistan, India and China. Due to some reasons google adsense is not offering its accounts easily to publishers from these areas. Main reason is scrap content. Which means there is not enough quality content on websites and blogs from these areas. Google is a world best platform for online advertising so google try its best to provide 100% quality platforms to its customers (advertisers) to advertise their products. That is why google adsense is not issuing account to these areas easily.
In This post i will tell you guys to apply and get approved for adsense in 24 hours. This is a hidden secret to get a google adsense account in 24 hours. just follow the instructions given below and apply for an adsense account and get approved within 24 hours. But always remember try this method only if you think you can maintain google standards and provide quality niche and content.
Follow these steps. Note: All steps are compulsory.

1- Creat a google account. You can create google account while sign up to gmail.

2- Go to Youtube.com and sign in with your google account.
(When you sign in to youtube with your google account. it means you have created a youtube channel where you can upload videos)

3- Upload up to 5 videos
(Only upload videos that are not copyright content. Means you should upload only those videos that are created by you, your friends or any family member. For example you shoot a video of your friend while flying kite etc.)

4- Verify your Youtube Channel.
(When you verify your Youtube channel it It allows you to upload unlimited video size, time and files)
To Verify Your Youtube Channel Read These instructions.

(i)  Go to your Video Manager than Click on Channel Settings > Features


(ii) Select your country, Select verification method than enter your Cell no
Get adsense account quickly

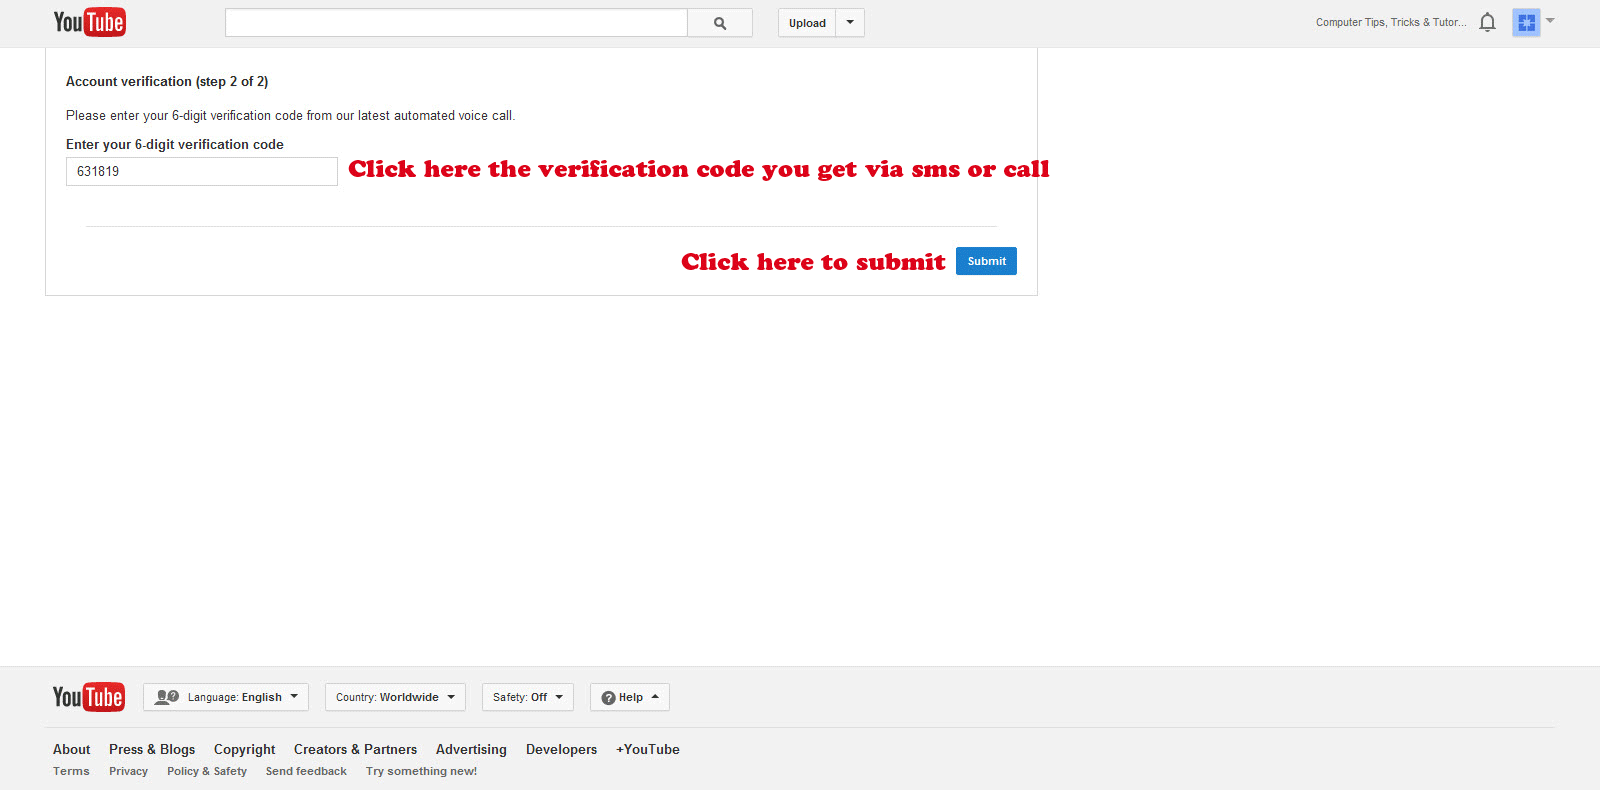
(iii) You will receive a verification code via sms or call. Enter that code and submit
get google adsese account easily

Now that your youtube channel is verified you can upload unlimited videos. Now move on to next step to apply for youtube monetization program.

Youtube Monetization Program or Youtube Partnership:

Youtube pays you money to upload videos. When you upload videos to youtube they allows you to show their ads in your videos. When some one views your monetized video they will shown ads by youtube. If anyone click on those ads you will be paid by youtube. Wait a minute, where that money is going? that money is going to a Google Adsense Account.

Apply to Youtube Monetization Program:

To apply for youtube monetization program follow these instructions.
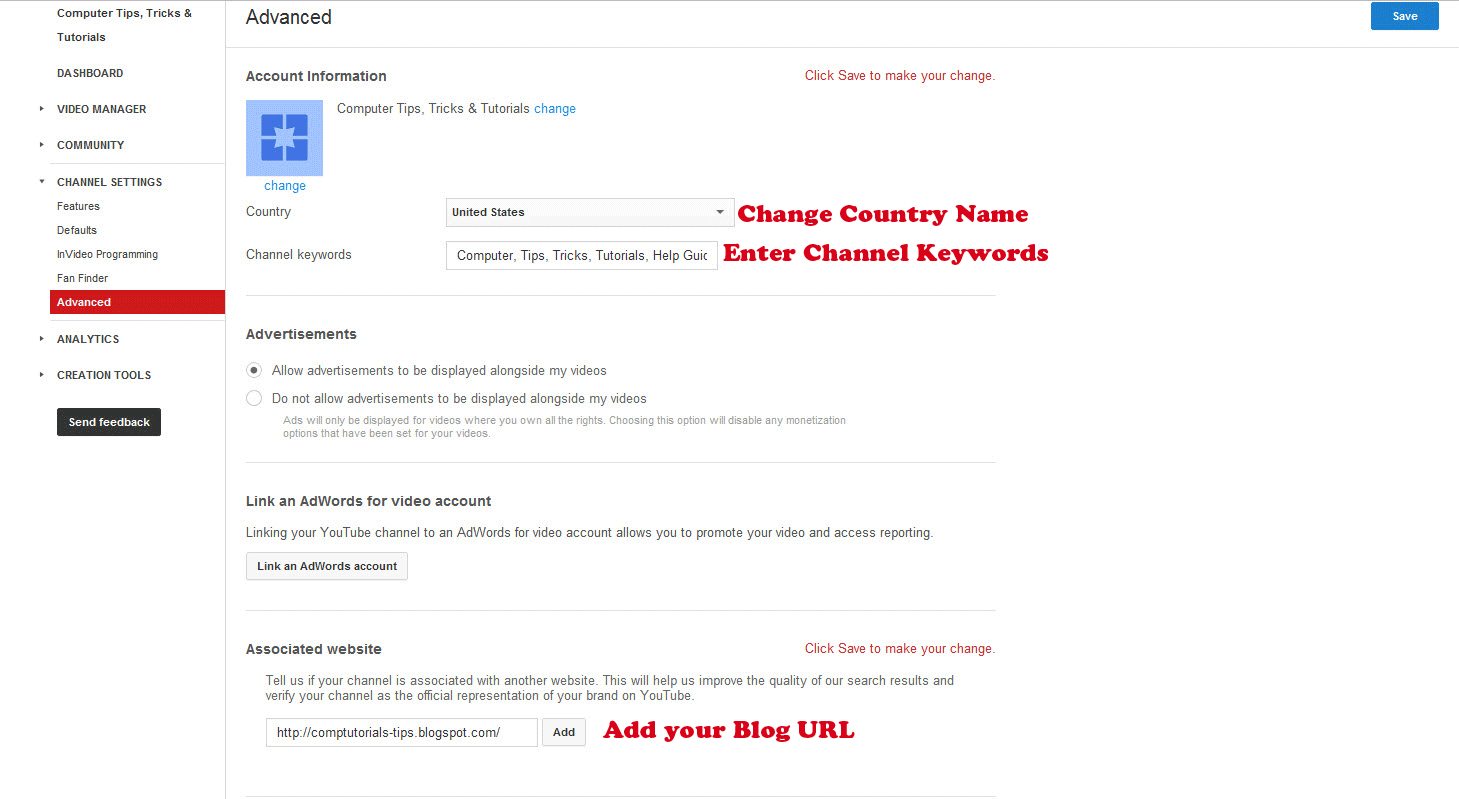
1:- Go to Channel Settings > Advance
2:- Change Country name to United States
3:- Enter your Blog Url
4:- Click Save
get google adsense account from youtube monetization program

5:- Go to Channel Settings and Click on "Enable" situated right with Monetization under features
youtube partnership monetization program

When you click on Enable you will be advance to another page where click on "Enable My Account"
You will be redirect to a wizard from where you have to select a new google adsense account and fill up your form. After submitting your application wait for 24 hours. After 24 hours sign in to google adsense account you will be signed in means that you have got your adsense account in 24 hours.

Read More: Monetize videos on youtube to Earn Money

Now keep uploading interesting watch able videos until you got minimum 5 dollar. Meanwhile keep updating your blog and when you think you are on an earning track from youtube and getting reasonable traffic on your blog than apply through your blog and use same adsense account. you will get approved for showing ads on your blog. now post ads on your blog. If you don't know about how to post ads on your blog

Read this: Showing Ads on you Websites or Blog

If you got any problem or confusion and want any kind of help about adsense do not hesitate to comment. I will help you as much as I can. Don't forget to share my post with your friends. Thanx


Read More

Sunday, February 9, 2014

Open Youtube in Pakistan

As we all know, Youtube is currently blocked in Pakistan. Therefore most of the People in Pakistan are unable to open Youtube. So they are unable to enjoy the latest videos and other happenings all around the world. No doubt Youtube is the biggest video sharing website. But people from Pakistan or other countries where youtube is blocked can't take full advantage of Youtube. I have a solution for all of those who can surf Youtube with full speed and safe browsing. Just follow the simple steps give below.
Open Youtube in Pakistan
Open Youtube In Pakistan
  • First of All, you have to download this small tool to secure your internet connection, that changes your Ip Address.

  • Click here to Download "Ultra Surf" tool.
  • Now follow the steps given in the Video below.
And then You can open Youtube with Full Speed.
Good Luck :)

Read More

Saturday, February 8, 2014

Make Windows Xp Professional Genuine

Windows Xp professional edition is the most widely used Operating System of all the time. Most people have pirated copy of windows Xp professional edition, due to which you cannot install latest microsoft updates, or other microsoft tools like Microsoft Security Essential(a renowned Antivirus program) and some other Microsoft windows tools. Its all due to Serial key you enter in the Product key box appear during installing windows  Xp. Most of them write this kind of Serial key QW4HD-DQCRG........... But Microsoft has blocked this Serial Key a long time ago. In this post, i will tell you how to make your Windows Xp professional Edition Genuine 100%. Just follow the simple steps below.
Ø  If you have already Installed windows Xp professional, then to make your windows Genuine first you need to download this tool named Keyfinder.
Ø  Click here to Download “Keyfinder.exe”
Ø  It will download in a minute. Once downloaded extract the file and open it.
Ø  Now your original key that you wrote will be showing in the box like this.
Make Windows Xp Professional Genuine
Keyfinder Tool
Ø  Now Click on Options and Click on Change Windows Key, And write the Original Product key in this window.
Ø  You can download this Genuine windows key from the link below.
Ø  Click Here to Download Genuine Windows Key File
Ø  Extract the keyfile and open in notepad. And write this Key in the Change key window, and Click Change.
Make Windows Xp Professional Genuine
Change Windows XP Key
Ø  That’s it. You are Done now. Now you can even validate your windows Online through Microsoft’s Official website, and now can enjoy benefits of a Genuine windows.
Good Luck.J

Read More

Friday, February 7, 2014

Install Windows Xp at Greater Speed

How  to Install Windows Xp Professional With greater Speed:

Windows Xp professional edition is very commonly used operating system for computers. Almost everyone knew how to install Windows Xp. But very rare of them knew a small trick about how to install windows Xp with greater speed. Usually it takes about 30 minutes to install windows Xp. But after reading my trick given below u can install windows Xp within 10 to 15 minutes. Here is the hidden trick begins.


  • Start installing windows using your windows Xp CD. 
  • When the setup starts and you select your drive to install windows, then it asks for Formatting the Device. Use NTFS Quick Format Option. 
  • After the completion of Copying files, the Computer will now Restarts.
  • When the System Restart, and you see the logo of Windows Xp loading. Press Shft+F10.
  • A command Prompt (CMD) will Appear.
  • Type Taskmgr in CMD prompt.
  • Now Task Manager will appear on the screen. Go To Processes Tab. And Search For SETUP.EXE
  • ight Click on the Setup.exe, And go to Set Priority option and set the Priority to HIGH.

install windows xp professional fast speed
Install Windows Xp Professional at Greater Speed in less than 15 minutes
Now close Task Manager, And you are Done. You will now Feel a boost in installation process. This is how i install Windows XP Professional at high speed. You will notice that windows installation will finish sooner than as it usually does.
Don't forget to Share this hiddern trick with your friends and mates...
Read More